Deploying Cachet - a status page clone
One of the things that I see a lot of sites deploy is status page from Atlassian, this is a system that provides a very simple status page.
I was curious if anyone had created a free version of status page and it was no surprise that there were several options out there so I decided to give Cachet a go.
One reason I picked Cachet is because it comes with a docker-compose option and as I'm keen on moving a lot of systems to docker I thought this would be a good opportunity to bring up something new using the native docker tools.
The Install
For this system I decided to spin up a CentOS 7.7 server and install docker and docker-compose on to it. This is just a matter of running three commands:
yum install -y docker
yum install -y docker-compose
systemd enable docker
The next part requires the git tool set to be installed, that's just another yum command:
yum install -y git
Now that docker and git are installed on the server it's just a matter of cloning the repository:
git clone https://github.com/cachethq/Docker.git cachet-docker
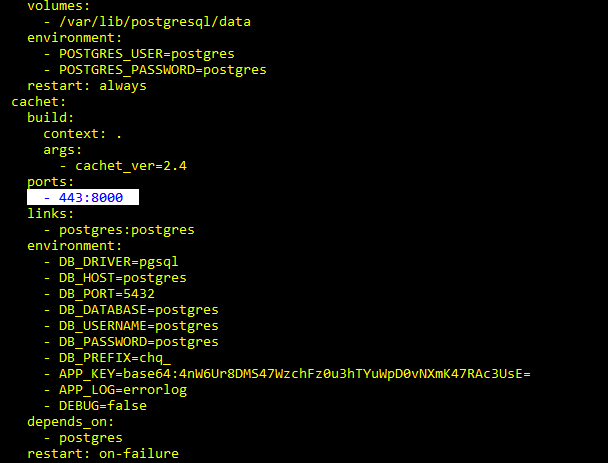
and then edit the docker-compose.yaml file to provide an app key, this can be any value as it's just used at build time to set an environment variable for cachet to find the database. The file also contains the credentials that the database is setup with, these can be changed as again, it's all there to build the service.
Once the changes are complete, save the file and issue the command:
docker-compose build
As long as there are no errors issue the command:
docker-compose -d up
The -d detaches the process from the foreground, running docker-compose in the foreground can be handy for troubleshooting but when running live, the -d means that you are not tying up the foreground process.
Once the containers are up and running just type in the IP address of the site and finish off the configuration.
That is pretty much all there is to using docker to bring up cachet. The problem here is that the default install does not use HTTPS and I was not happy with that. Fortunately, adding HTTPS is not that difficult.
Adding HTTPS
The first thing to do is to generate a private/public key pair. As this is purely and internal server I used PFSense to generate both parts of the cert.
I then created a folder called "certs" in the docker file structure, because I need to copy the cert files into the container I need to ensure that the files are in the folder structure where my Dockerfile lives.
Next, edit the docker-compose.yaml file and change the port from 80 to 443
Now edit the nginx-site.conf file to tell it that it has two certs, this file is located in the conf subdirectory, as it's nginx it just needs to be told where the cert is:
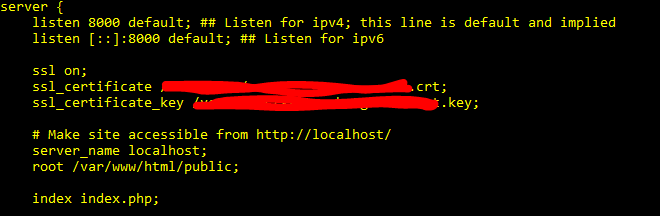
note that nginx is listening on port 8080, this is the port that the container is using but docker will translate that from whatever port we using the docker-compose.yaml file. This is the same line that has to be edited to change port 80 to 443.
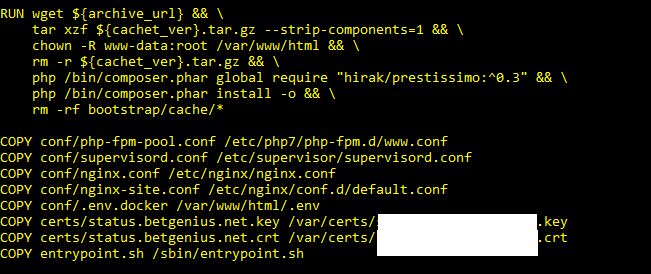
Finally, edit the Dockerfile to copy the certs into the image. The Dockerfile already does some file copying so I just added a copy more copy commands to it that section.
Now, the first time I tried this I kept getting an error

The error was not helpful, it says that the certs are not found but a copy and paste of the path says all is fine and the directory is at the same level as the conf folder that copies fine.
The real reason for this error is because the .dockerignore file only allows for the conf folder and the entrypoint.sh file to be copied. The fix is to edit the .dockerignore file and add an exlusion for the certs folder which is done by adding the line !certs into the .dockerignore file:

Once this change has been made, docker-compose build should work fine and you should now have a free status page clone up and running docker and using secure certs.
Subscribe to Ramblings of a Sysadmin
Get the latest posts delivered right to your inbox